AF099 · Lesson 32 of 71
Tactical Combat Casualty Care
Table of ContentsShow
- Overview
- Welcome
- Lifesaving skills you must perform
- How you will be evaluated
- Three Phases of TCCC
- Care Under Fire / Threat
- Tactical Field Care
- Tactical Evacuation Care
- Phase 1: Care Under Fire or Active Threats
- Introduction to drags and carries
- Phase 2: Tactical Field Care
- Medical supplies you'll need
- Massive Bleeding
- Conduct a blood sweep
- Tourniquet
- Wound Packing with Hemostatic Dressing
- ASM Pressure Dressing Application
- Airway
- Clearing the Airway
- Opening the Airway
- Airway Maneuvers
- Recovery Positions
- Respiration
- Assess for respiratory distress
- Assess for potential life-threatening chest injuries
- Circulation
- Signs and symptoms of shock
- Hypothermia
- Signs of hypothermia
- Prevention
- Additional Injuries (Address, Report, and Document)
- Secondary Injuries
- Penetrating Eye Injury
- Assess for Burns
- Assess for Fracture
- Assess for Head Injury
- Communication and Documentation
- Document on the DD Form 1380 / TCCC Card
- Summary
Heads up: This section covers wound care, bleeding control, and battlefield medicine. Some readers may find the imagery and descriptions difficult.
In a real medical emergency, call 911 (CONUS) or follow local emergency protocol. The procedures below are training reference - your formal TCCC certification covers them in much more depth.
Tactical Combat Casualty Care (TCCC) is designed to teach service members how to effectively treat combat-related injuries to complete the mission. Tactical and environmental factors have a profound impact on trauma care rendered in the battlefield. Improvements in how this is accomplished have resulted in significantly lower death rates in combat.
To render care, you'll need to maintain your self-control and be resilient through the process - treating someone can be a stressful situation.
This section covers the three phases of TCCC, Phase 1: Care Under Fire, and Phase 2: Tactical Field Care (the MARCH sequence - Massive Bleeding, Airway, Respiration, Circulation, Hypothermia - plus secondary injuries).
Overview
Objective: Identify basic facts and general principles about skills necessary for an Airman while deployed.
Learning Outcomes
- Describe the practice of TCCC.
- Describe the use of a first aid kit.
- Perform a rapid casualty assessment.
- Demonstrate basic care for a casualty with massive bleeding.
- Demonstrate basic care for a casualty with a compromised airway or in respiratory distress.
- Describe basic care of burns.
- Describe basic care of fractures.
- Describe basic care of an eye injury.
- Identify a head injury.
- Describe point-of-injury communication strategies and casualty care documentation.
Foundational Competencies
- Resilience - The process of negotiating, managing, and adapting to significant sources of stress or trauma.
- Self-Control - The ability to keep emotions under control and to restrain negative actions when under stress.
Summary
- Welcome
- Three Phases of TCCC
- Phase 1: Care under fire or active threats
- Phase 2: Tactical Field Care
Welcome
Per DoD Instruction 1322.24, Medical Readiness Training (MRT), ALL service members (officer and enlisted) will receive role- based initial entry TCCC training and certification:
- All Service Members
- Combat Lifesaver
- Combat Medic / Corpsmen
- Combat Paramedic / Provider
By the end of this course, you'll know the fundamental concepts of TCCC and be able to perform 5 lifesaving skills at a basic competency level.
There are four tiers of TCCC training:
- Tier 1 - All Service Members (ASM) - this BMT course.
- Tier 2 - Combat lifesavers (some additional training prior to deploying).
- Tier 3 - Combat medics and corpsmen.
- Tier 4 - Combat paramedics and medical providers.
Lifesaving skills you must perform
Bleeding Control
- Rapid casualty assessment
- Tourniquet application
- Hemostatic dressing
- Pressure dressing
Airway & Breathing
- Airway maneuvers
How you will be evaluated
- One skills assessment.
- No more than two attempts per task.
- No written examination.
Three Phases of TCCC
Care Under Fire / Threat
The area or scene is NOT SAFE and you're currently under hostile fire. Quick decision-making - ensure the scene is safe. Move the casualty to safety. Once the casualty is in a safe location, identify and control life-threatening bleeding.
Tactical Field Care
The area is SAFER than Care Under Fire / Threat. While providing medical aid, be quick in making your decisions.
Tactical Evacuation Care
Medical aid or care provided during transport to an advanced medical care facility, depending on the trauma scenario. Covered in more advanced TCCC tiers.
Phase 1: Care Under Fire or Active Threats
Return fire and take cover. Direct the casualty to move to cover if they're able to, and never attempt to rescue a casualty until the scene is safe.
Secure the casualty by immediately moving them to safety if it's safe for you to do so. Check for responsiveness, reassure, and talk them through what you're doing.
For life-threatening bleeding: place a hasty tourniquet "High and Tight" on the wounded extremity. If under fire and unable to reach the casualty, have the casualty place a hasty tourniquet on themselves if they're responsive and able - then reassess in Tactical Field Care or Phase 2.
The order of your actions is dictated by the situation. Constantly assess the risks or threats and make a plan before moving a casualty.
Introduction to drags and carries
One-person Kit or Arm Drag
With the casualty laying on their back, stand near the casualty's head. Grab the top portion of the casualty's vest or OCP coat near each shoulder, or grab one of the casualty's arms. Begin walking backwards, dragging the casualty to safety. Make sure the casualty's head is lifted off the ground to prevent further injuries.
One-person Supporting Carry
Help the casualty stand up and put one of the casualty's arms over your shoulders. Wrap one of your arms behind the casualty's back to stabilize. To further secure, grab the back portion of their belt. Help them walk to safety.
Two-person Supporting Carry
Nearly identical to the one-person supporting carry - except one person on each side. Allows the casualty's full body weight to be supported and carried if they cannot walk.
Two-person Kit or Arm Drag
Nearly identical to the one-person kit/arm drag - but one person on each side of the casualty's head. Each wingman grabs the top portion of the casualty's vest or OCP coat near the shoulder closest to them. The casualty can then be dragged to safety - make sure the casualty's head is lifted off the ground.
Reeves Sleeve / Belay Line Movement
Generally reserved for tight quarters like a Naval vessel. The casualty is strapped down to a litter to secure the patient. To lower the casualty down ladders or steep/narrow stairs, appropriate ropes and clips are used.
Neck Drag
If the casualty is laying on their back and conscious, position yourself on your hands and knees over the casualty. Have the casualty wrap their arms around the back of your neck and bear crawl towards safety while the casualty holds on. Make sure the casualty has a firm hold around your neck before moving.
Fireman's Carry
With the casualty on the ground, grab one of their arms and pull them up into a standing position. As they're standing, squat down and reach for the leg on the same side as the arm you grabbed. Put the casualty up onto your shoulder as you stand up. Use your legs as you lift up. Once standing, ensure your arm is hooked around the casualty's leg while holding their wrist or arm. Their arm will be across your chest.
Phase 2: Tactical Field Care
In Phase 2, the area is safer - use the MARCH sequence to guide a rapid casualty assessment:
- M - Massive bleeding (#1 Priority)
- A - Airway
- R - Respiration / breathing
- C - Circulation
- H - Hypothermia
After completing MARCH, attend to secondary injuries.
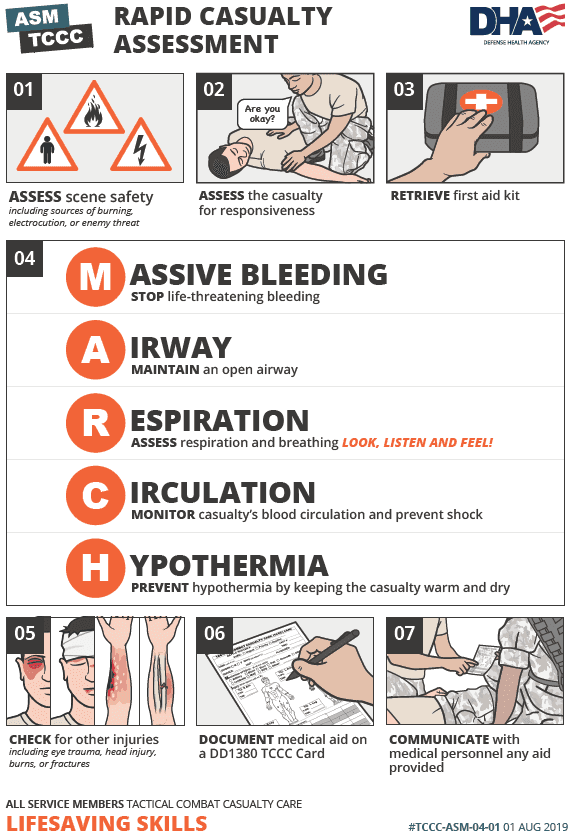
Official DHA Lifesaving Skills poster - Rapid Casualty Assessment.
Medical supplies you'll need
- Tourniquet
- Hemostatic dressing
- Pressure bandage or emergency trauma dressing
- DD Form 1380 / TCCC Card
There are different types of first aid kits:
- Personal first aid kit - includes Joint First Aid Kit (JFAK) and Individual First Aid Kit (IFAK).
- Service or unit-specific first aid kit.
Always know what first aid materials you have in your work area.
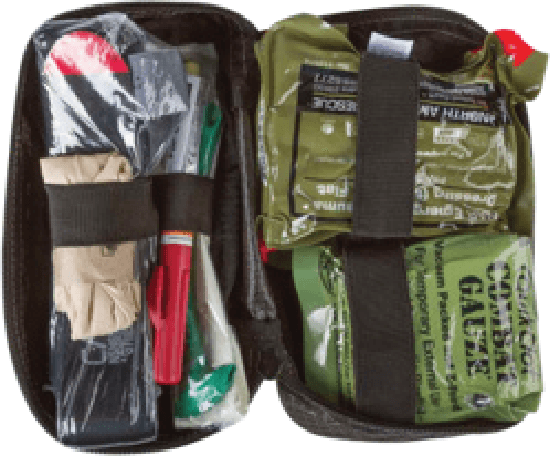
Fig 40-1: Joint First Aid Kit (JFAK) and Individual First Aid Kit (IFAK).
Massive Bleeding
Recognizing massive and life-threatening bleeding involves looking for certain signs:
- Bright red blood that is pulsing, spurting, or steadily bleeding from the wound or amputation.
- Blood pooling on the ground, or the clothing or bandage soaked with blood.
Casualties with severe injuries can bleed to death in as little as three minutes.
Conduct a blood sweep
Identify massive bleeding regardless of restrictions from uniforms, equipment, low light, low visibility, etc.
- Start at the casualty's head and examine the body in a
clockwise order to ensure the entire body is checked:
- Head/neck
- Front/back of torso
- Right arm
- Right leg
- Left leg
- Left arm
To examine: place both hands underneath each of these areas on opposite sides. Touch your fingertips together underneath the area, then sweep your fingertips up and against the casualty's body. Bring your hands towards your eyes and rub fingers together so you can visibly see and/or feel if there's blood. The full length of each area must be examined this way.
If massive bleeding is identified, immediately begin controlling it. Three tools to use:
- Tourniquet
- Hemostatic dressing
- Pressure bandage
Tourniquet
Four main parts
- Windlass rod - continuously turned to tighten the main band around the injured limb.
- Windlass clip - holds the windlass rod in place to prevent unwinding.
- Windlass safety strap - additional barrier to hold the windlass rod in place. Some are designed to have the tourniquet time annotated on the safety strap.
- Single routing buckle - the plastic buckle the band is fed through.
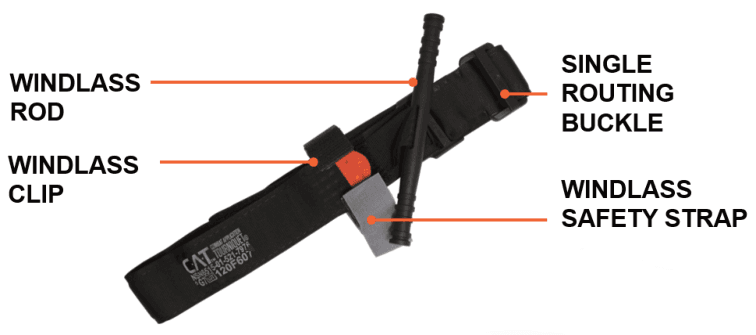
Fig 40-2: Combat Application Tourniquet (CAT) - main parts.
Tourniquet application
Tourniquets cut off blood flow past the application site. All service members need to be able to properly apply a tourniquet to stop bleeding within one minute.
When and how to apply depends on the situation:
- Care Under Fire - hasty tourniquet placed "High and Tight" on the wounded extremity, or when the bleeding source is uncertain.
- Tactical Field Care - deliberate tourniquet applied 2-3 inches above the wound.
If the bleeding doesn't stop, apply a second tourniquet. A severe bleeding wound to the thigh frequently requires a second tourniquet.
The tourniquet comes pre-assembled in a "quick launch" configuration to slide onto an injured extremity. This allows for one-handed self-application. The large band wraps around the arm or leg.
- Place the tourniquet 2-3 inches above the wound.
- If the wound is not visible, place the tourniquet as high as possible on the injured arm or leg.
- Place the windlass clip and rod on the outside of the body.
- DO NOT place inside the armpit or groin area.
- DO NOT place directly over a joint such as the knee or elbow.
To apply:
- Slide the tourniquet loop on the injured arm or leg.
- The Velcro band is self-adhering - pass it through the routing buckle.
- Pull tight and adjust the Velcro band to fit. Fasten as tightly as possible.
- The tourniquet should be tight enough that three fingers cannot slide under the band.
- Critical: all slack must be removed from the band BEFORE turning the windlass rod.
- Do not adhere the band past the windlass clip - if too soon, it interferes with turning the rod.
- Continuously turn the windlass rod to tighten until the bleeding stops.
- Once stopped, place the windlass rod in the windlass clip and secure with the windlass safety strap (the "Time Strap") - used to annotate the time the tourniquet was applied.
- Check for pulse near the end of the injured limb. Arm = wrist; leg = foot or ankle. Properly applied = blood flow stops, no pulse felt.
- Reassess every 2-5 minutes. If bleeding resumes or pulse is present, remove the windlass rod from the clip and turn until bleeding stops and pulse is absent. Reposition into the clip and secure with the safety strap.
- Once bleeding stopped and rod secured, adhere Velcro band inside and past the windlass clip and secure with safety strap (so the band can't be unfastened accidentally).
Tourniquet application should be completed within three minutes. Document the time on the windlass safety strap (the "time strap") and on the DD Form 1380 / TCCC Card. If the strap has no space and there's no TCCC card available, write the time on the casualty's forehead.
When medical providers arrive, inform them of your findings and treatment, and assist in evacuating.
The tourniquet is NOT suited for back, chest, abdomen, groin, and neck injuries. Always reassure your casualty and let them know what you're doing - a properly applied tourniquet will be painful.
Common errors when performing tourniquet application
- The self-adhering Velcro band is NOT pulled tight enough at onset.
- Windlass rod is NOT turned tight enough to stop bleeding.
- The tourniquet was NOT applied fast enough - didn't stop bleeding within one minute.
Use caution when considering the use of an improvised tourniquet. Can cause further damage to the skin if the band is too narrow. Bleeding may worsen and may not be completely controlled. May also loosen over time from not being properly secured.
If no tourniquet is available, pack the wound and hold direct pressure over the main source of bleeding.
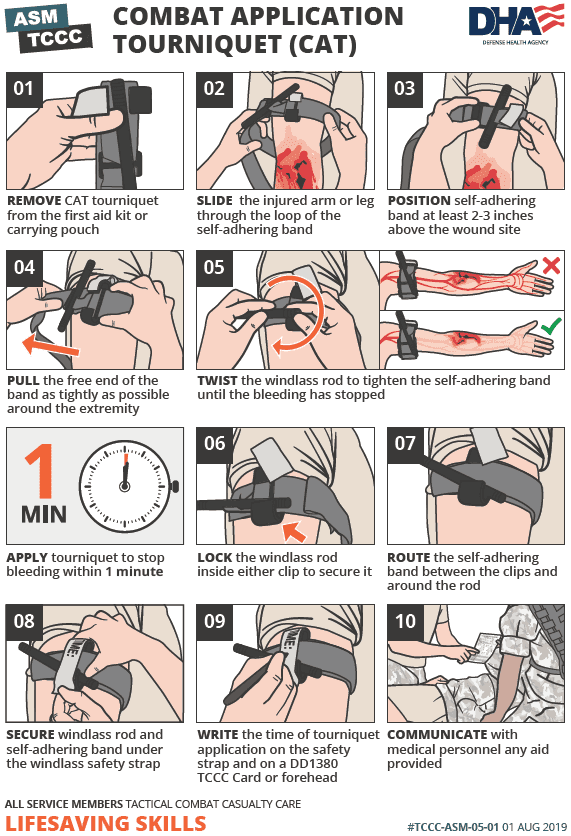
Official DHA Lifesaving Skills poster - Combat Application Tourniquet (CAT).
Wound Packing with Hemostatic Dressing
A hemostatic dressing can be found in your first aid kit. Combat Gauze is the dressing of choice (chosen by the committee on TCCC), but three approved alternatives:
- ChitoGauze
- CELOX Gauze
- XStat - Best for deep, narrow-tract wounds.
Hemostatic dressings help clot formation and stop bleeding. If you don't have a first aid kit, improvise using the cleanest cloth available. Wound packing is used when the tourniquet is not indicated or possible, or the bleeding persists despite other measures.
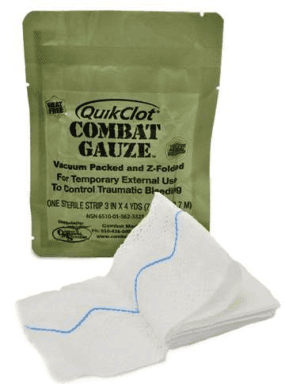
Fig 40-3: Hemostatic Dressing.
To apply:
- Identify the wound and expose the injury by opening or cutting away clothing.
- Locate the source of most active bleeding.
- Wipe away excess blood if possible - but leave clots that may have formed.
- Hold pressure on the bleeding area while opening the dressing and removing the sterile hemostatic dressing from the package.
- Confirm the wound is not in a place where a tourniquet can be effectively applied - then pack tightly into the wound.
- If there is a penetrating object, bandage the object in-place. DO NOT remove - may cause increased bleeding.
- Make a small ball with the gauze and feed it into the wound under your finger while holding pressure. Pack the entire cavity space.
- More than one hemostatic dressing gauze may be required.
- After packing, continue firm manual pressure until bleeding stops. Hold direct pressure for a minimum of three minutes.
Continually reassess. Blood should NOT be seeping through or around the gauze. Once bleeding is controlled, apply a pressure bandage to secure the dressing in the wound. Document care on the DD Form 1380 / TCCC Card.
When medical providers arrive, inform them of findings and treatments, and assist in evacuating.
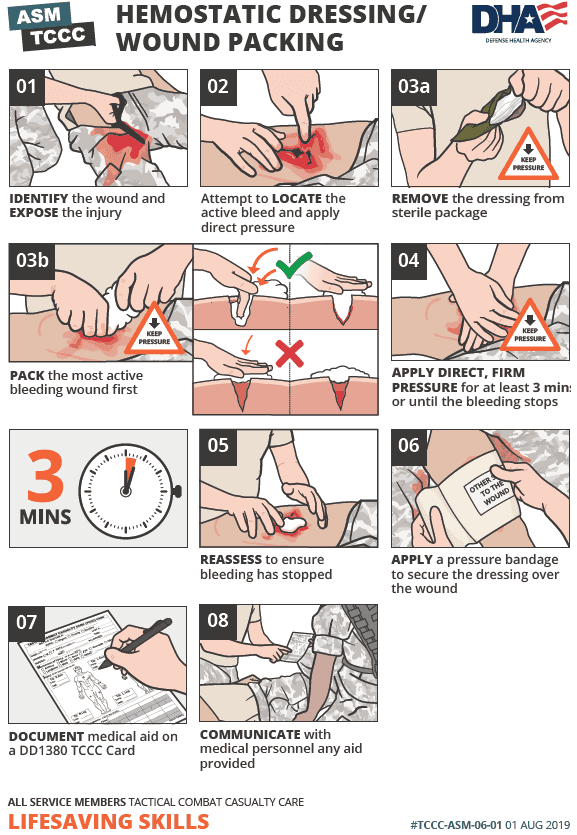
Official DHA Lifesaving Skills poster - Hemostatic Dressing / Wound Packing.
ASM Pressure Dressing Application
- Open the package and expose the sterile portion of the dressing.
- Place the sterile pad directly on the dressing or open wound and apply direct pressure over the wound with the sterile pad.
- Use your thumb or any other digit to apply direct pressure over the site.
- Once the wound is secured, wrap the bandage evenly around the wound and over the dressing while continually applying direct pressure.
- If your pressure dressing has the pressure bar, after wrapping it once around the injured area, insert the bandage completely into the bar. Pull the bandage and pressure bar in the reverse / opposite direction and continue wrapping.
- As you wrap, use short tugs to stretch the bandage fully. Be careful NOT to pull the gauze out of the open wound as you wrap.
- After fully wrapped, secure the end by hooking it on the closing bar into the top and bottom edges of the bandage.
- Continually assess circulation below the pressure dressing. Re-adjust, loosen, or re-secure as necessary.
If the skin below the dressing becomes blue, cool to the touch, numb, or a pulse is no longer present, the pressure dressing may be too tight and may need to be adjusted. Document care on the DD Form 1380 / TCCC Card.
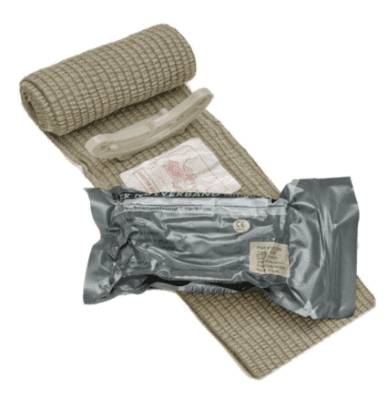
Fig 40-4: Pressure Dressing.
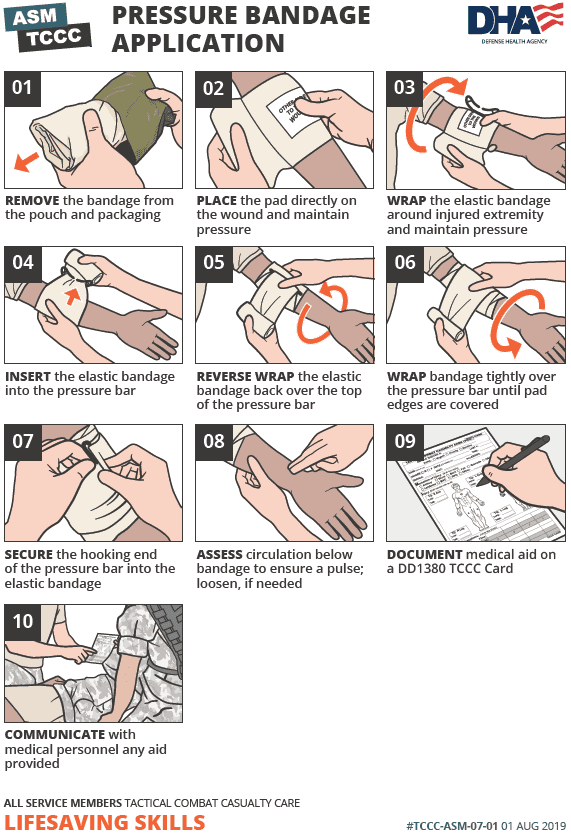
Official DHA Lifesaving Skills poster - Pressure Bandage Application.
Airway
Clearing the Airway
You must ensure a casualty's airway is open. Signs and symptoms it may be blocked:
- Severe trauma to the face
- Blood or foreign objects in the airway
- Casualty indicates they can't breathe
- Snoring or gurgling sounds
Opening the Airway
Assist a conscious casualty by helping them assume a comfortable, sitting-up position to allow easier breathing. If the casualty does NOT have an airway obstruction, perform the head-tilt/chin lift or jaw-thrust maneuver.
If the casualty is unconscious and NOT in shock, place them in the recovery position (if able to without disturbing previously treated injuries).
Airway Maneuvers
If the casualty is awake with no breathing problems, place them in the position that allows them to breathe comfortably.
If the casualty is unconscious or has facial injuries / potential obstruction:
- Kneel near the casualty's head.
- Roll the casualty onto their back on a hard surface.
- Place them on a flat surface if possible.
- Open the mouth and look for anything blocking the airway:
- Cuts
- Obstructions
- Broken teeth
- Burns or swelling
- Other debris (vomit)
Remove visible obstructions immediately. DO NOT put your fingers blindly into the casualty's mouth.
Use the jaw-thrust technique if neck or spine injuries are suspected. Suspect them in cases of obvious head/neck trauma, blast injuries, or motor vehicle accidents.
Jaw-thrust technique
- Position yourself in a kneeling position at the head of the casualty.
- Lean and rest your elbows on the ground.
- Place your forearms along the casualty's head to stabilize while ensuring NOT to rotate or move their neck or head.
- Place your fingers under the curved part of the jaw, fingers below the ears.
- Place your thumbs onto the chin.
- Use your index fingers to pull the lower jaw up, while using your thumbs to push the chin forward.
- If lips remain closed, pull back the lower lip and open the mouth to let air flow.
Reassess breathing with look, listen, and feel:
- Look for the rise and fall of the chest.
- Listen for breathing sounds.
- Feel for breath against your cheek.
Head-tilt/Chin lift
If there's no suspicion of neck or spine injury:
- Place the palm of your hand on the casualty's forehead.
- Apply even backwards pressure and tilt the head back gently.
- Place the fingertips of your other hand under the tip of the bony part of the lower jaw, with your thumb on top (front) of the chin, and bring the chin forward.
- DO NOT press deeply into the soft tissue under the chin - could close the airway.
- The mouth should NOT be closed; the thumb may be used to open the lower lip if needed.
Recovery Positions
Before placing the casualty in the recovery position, be aware of any other injuries and ensure they're accessible for treatment and re-assessment.
To execute the recovery position:
- Position one arm up, placing the hand behind the head.
- Bend the other arm across the casualty's chest.
- Position yourself on the casualty's side that has their arm bent with their hand behind their head.
- Grab the knee of the casualty's leg furthest from you and pull it towards you so that the leg is bent at the knee with the foot or ankle resting on the inside of their leg.
- Grab the casualty's shoulder and hip so you can rotate them onto their side while making sure that the bent knee is on top of the casualty.
Place all unconscious casualties in the recovery position UNLESS they have suspected head or neck trauma.
If the casualty:
- Is unconscious
- Has a respiratory rate of less than two breaths in 15 seconds, OR
- Is making a snoring or gurgling sound
…they may need a nasopharyngeal airway. Communicate this to responding medical personnel and document on the DD Form 1380 / TCCC Card.
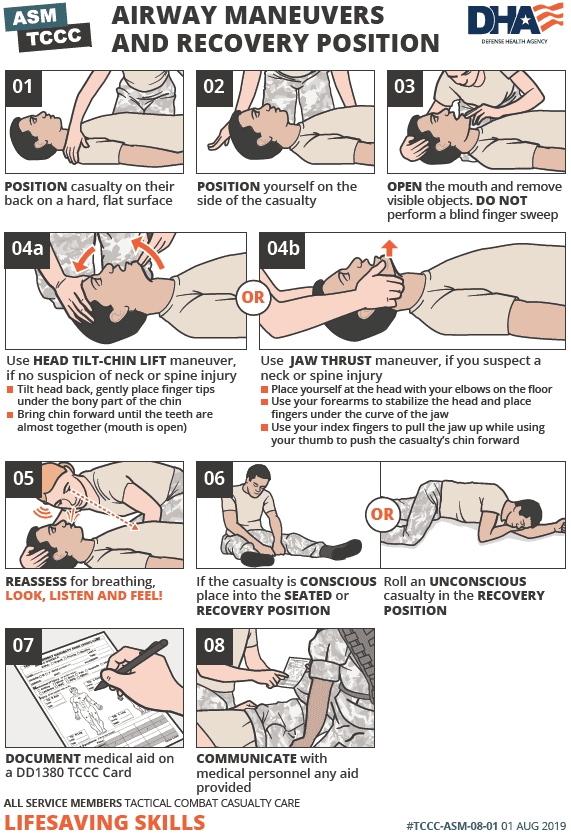
Official DHA Lifesaving Skills poster - Airway Maneuvers and Recovery Position.
Respiration
Assess for respiratory distress
Signs of respiratory distress:
- Difficulty breathing
- Struggling to get air in and out
- Breathing is too weak to be effective (less than six times per minute)
- Rapid breathing (greater than 20 times per minute)
Report findings to medical personnel at the scene.
Assess for potential life-threatening chest injuries
Types of chest injuries:
- Penetrating wounds
- Blast injury
Visually and physically examine front and back for significant torso trauma by raking the chest with the hand to physically examine. Roll the casualty on their side or reach under them only if you can do so without disturbing previously treated injuries.
Do NOT pack chest wounds with any type of dressing. Report a severe chest injury to medical personnel immediately.
Circulation
Prevent shock by controlling the bleeding and - if the casualty has a tourniquet - confirm it's still applied tightly. Consider elevating both legs higher than the casualty's heart only if their airway tolerates lying flat on their back and you can do so without disturbing previously treated injuries.
Signs and symptoms of shock
- Rapid breathing
- Losing focus and difficulty engaging
- Sweaty, cool, clammy skin
- Pale or gray skin
Hypothermia
Prevent and address hypothermia worsened by massive blood loss. Note: this is not hypothermia due to cold weather.
Signs of hypothermia
- Slurred speech or mumbling
- Slow breathing and drowsiness
- Shivering
Prevention
- Keep clothing or uniform on the casualty.
- If clothing is extremely wet, replace it to keep the casualty dry.
- Ensure the casualty is off the ground.
- Use blankets, poncho liners, sleeping bags, or anything that retains heat.
- Minimize exposure to the environment by keeping them off the ground.
Additional Injuries (Address, Report, and Document)
Secondary Injuries
- Head injury
- Eye trauma
- Fractures
- Burns
Penetrating Eye Injury
If a penetrating injury is noted or suspected:
- Shield the injured eye by covering it with a RIGID EYE SHIELD - NOT a pressure patch.
- Place the shield over the injured eye only - NOT on both eyes.
- Tape it in place.
- If no rigid eye shield is available, tactical eyewear can be used to protect the eye.
IMPORTANT! Do NOT apply pressure to a penetrating eye injury.
Assess for Burns
- Superficial burns (1st degree) - like a sunburn; reddened appearance.
- Partial thickness (2nd degree) - blisters; reddened appearance.
- Full thickness (3rd degree) - may appear dry, stiff, and leathery and/or white, brown, or black.
To care for the burn: COVER the burn area with a dry, sterile dressing and COVER the casualty to prevent heat loss and keep them dry.
In case of electrical injury:
- Secure the power if possible.
- If you can't secure the power, remove the casualty from the electrical source using a NON-CONDUCTIVE object (a wooden stick) and move them to a safe place.
Assess for Fracture
Two types: closed fractures and open fractures. Warning signs:
- Significant pain and swelling
- An audible or perceived "snap"
- Different length or shape of limb
- Loss of pulse or sensation in the injured arm or leg
- Crackling or popping sound under the skin
Application of a Splint
A splint is used to prevent movement and hold an injured arm/leg in place using a semi-rigid or improvised rigid splint. Incorporate the joint above and below the fracture
- then secure with an ace wrap, cravats, belts, or duct tape.
Try to splint before moving the casualty and minimize movement of the fractured extremity. Arm fractures can easily be secured to the shirt using the sleeve as a sling.
Ensure the bandage is not too tight - could cause decreased circulation to the fingers or toes.
Assess for Head Injury
Blunt head trauma - result of blunt force, acceleration, or deceleration of forces. Could be caused by:
- An explosion or blast
- Motor vehicle collision or roll-over
- A fall or sports injury
Penetrating trauma - usually gunshot wounds, stabbings, or fragmentation from explosives.
Signs and symptoms:
- Altered consciousness
- Disorientation or dizziness
- Headache
- Ear ringing
- Nausea or vomiting
- Amnesia
- Double vision
Report signs and symptoms of head injury to medical personnel at the scene.
Communication and Documentation
Communicate with the casualty to encourage, reassure, and explain care. Communicate with the tactical leadership, provide leadership (Tactical Operations Center) with the casualty's status and locations. Also communicate with medical personnel to discuss the casualty's injuries and symptoms - and any medical aid provided.
Document on the DD Form 1380 / TCCC Card
- Casualty assessment findings
- Medical aid rendered
- Changes in casualty status
- Attach the DD Form 1380 / TCCC Card to the casualty's belt loop, or place it in their upper left sleeve or the left trouser cargo pocket.
Summary
The TCCC course was designed to give you the concepts of tactical care and to perform five lifesaving skills at a basic competency level. By using these concepts, you have the potential to save someone's life.
While performing care, your job is to act using these skills until first responders or medical personnel arrive on scene. Medical situations can happen anywhere and anytime. You never know when you'll be called upon, so be ready.