AF099 · Lesson 31 of 71
Foundational Airman Skills Training
Table of ContentsShow
- Overview
- Levels of Threat
- Protecting Against Threats
- Force Protection Conditions (FPCONs)
- Integrated Defense (ID)
- Cover and Concealment ("See First")
- Weapon Discipline When Using Force
- Field Camp Security ("Understand First")
- Engaging Possible Threats
- Sign / Countersign ("Understand First")
- Duress Words
- SALUTE Reports
- Detainment Procedures
- Tactical Movements ("See, Understand and Act First")
- Use of Force
- Three elements
- Types of Force
- Deadly Force Weapon Procedures
- Summary
Foundational Airman Skills Training (FAST) is identifying and applying Integrated Defense skills associated with protecting our air bases through the full spectrum of air and space operations.
Making well-informed decisions and maintaining self-control are important factors with FAST. This depends on the flexibility of all Airmen - not just Security Forces - to contribute to the defense of the installation while performing their primary functions. Throughout your career, you must be resilient and retain proficiency in basic readiness skills, whether at home station or deployed.
This section covers levels of threat, protecting against threats, engaging possible threats, and the use of force.
Overview
Objective: Identify basic facts and general principles about skills necessary for an Airman while deployed.
Learning Outcomes
- Apply Levels of Threat knowledge to influence actions and decisions for successful completion of FAST scenarios.
- Apply knowledge of Force Protection Conditions, Integrated Defense Courses of Actions, Cover and Concealment procedures, Weapons Discipline, and Field Camp Security to effectively protect against threats.
- Apply Challenge Procedures, Sign/Countersign Procedures, Duress Word, SALUTE Reports, Detainment Procedures, and Tactical Movements to effectively engage possible threats.
- Apply Use of Force elements and types of force key aspects for successful completion of FAST scenarios.
Foundational Competencies
- Decision Making - Makes well-informed, effective, and timely decisions; uses sound judgment to integrate and weigh situational constraints, risks, and rewards.
- Flexibility - The ability to adapt to and work with a variety of situations, individuals, or groups effectively.
- Resilience - The process of negotiating, managing, and adapting to significant sources of stress or trauma.
- Self-Control - The ability to keep emotions under control and to restrain negative actions when under stress.
Summary
- Levels of Threat
- Protecting Against Threats
- Engaging Possible Threats
- Use of Force
Levels of Threat
Per AFI 31-101, Integrated Defense:
| Level | Description |
|---|---|
| Level I | Includes enemy agents and terrorists whose primary mission includes espionage, sabotage, and subversion. Enemy activity and individual terrorist attacks may include random or directed killing of military and civilian personnel, kidnapping, and/or guiding special purpose individuals or teams to targets. |
| Level II | Includes small-scale, irregular forces conducting irregular warfare that can pose serious threats to military forces and civilians. These attacks can cause significant disruptions to military operations and the orderly conduct of local government and services. |
| Level III | Capable of projecting combat power by air, land, or sea, anywhere into the operational area. Threats necessitate the command decision to commit a tactical combat force or other significant available forces to counter. |
Protecting Against Threats
Force Protection Conditions (FPCONs)
Local commanders set/implement specific measures for protecting assets under their control and decide on raising FPCON levels.
| FPCON | Response |
|---|---|
| Normal | General global threat of possible terrorist activity exists but warrants a routine security posture. |
| Alpha | Increased general threat of possible terrorist activity against personnel or facilities, nature and extent unpredictable. Must be capable of being sustained indefinitely. |
| Bravo | Applies when an increased or more predictable threat of terrorist activity exists. Sustaining Bravo measures for a prolonged period may affect operational capability and relations with local authorities. |
| Charlie | Applies when an incident occurs or intelligence is received indicating some form of terrorist action or targeting against personnel or facilities is likely. These measures will create hardship and affect activities of the unit and personnel. |
| Delta | Applies in the immediate area where a terrorist attack has occurred or intelligence indicates terrorist action against a specific location or person is imminent. Normally declared as a localized condition - not intended to be sustained for long periods. |
Integrated Defense (ID)
Integrated defense is the incorporation of multidisciplinary active and passive, offensive and defensive capabilities, used to mitigate potential risks and defeat adversary threats to AF operations within the base boundary and base security zone.
ID integrates multiple AF capabilities within the risk management process - focused on achieving specific desired effects to protect and defend critical assets.
ID desired effects:
- Anticipate
- Deter
- Detect
- Assess
- Warn
- Defeat
- Delay
- Defend
- Recover
ID Courses of Action (COAs) comply with applicable laws and regulations. Local laws, customs, and culture, Status of Forces Agreements (SOFA), Rules of Engagement (ROEs), and Law of War may impose constraints. Installations work to synchronize ID efforts with friendly forces operating within the base security zone.
Cover and Concealment ("See First")
If you can be seen by the enemy, you are a target.
- Cover - provides protection from bullets, fragments of exploding rounds, flame, nuclear effects, and biological / chemical agents (direct/indirect fire). May be natural (rocks, trees, ravines) or man-made (defensive fighting positions [DFPs], trenches, walls, buildings, vehicles, debris).
- Concealment - anything that hides you from observation.
Does NOT necessarily protect you from enemy fire. May be
natural (bushes, trees, grass, shadows) or man-made
(Operational Camouflage Pattern [OCP] uniform, camouflage
netting, face paint).
Note: if possible, natural concealment should not be disturbed.
Weapon Discipline When Using Force
Safety
- Selector lever on "Safe" until ready to fire; thumb resting on top of the lever.
- Index of trigger finger outside the trigger guard and on the receiver.
- Maintain muzzle discipline with 360° situational awareness.
- Practice safe threat discrimination - positively identify the threat and see it before shooting.
- Be aware of what's behind your target before shooting.
- DO NOT shoot faster than you can think!
Weapon carry positions
Low Ready Position
- Feet approximately shoulder width apart.
- Toes pointed toward threat.
- Strong-side foot slightly back.
- Knees slightly bent.
- Weight on balls of feet.
- Upper body aggressively forward.
- Shoulders over knees, slightly angled to threat.
- Nose over toes.
- Head up, both eyes open.
- Grip: buttstock firmly in shoulder; muzzle pointed downward below belt line; elbows down against rib cage; thumb on selector.
High Ready Position
- Feet approximately shoulder width apart.
- Toes pointed toward threat.
- Strong-side foot slightly back.
- Knees slightly bent.
- Shoulders square to threat.
- Grip: buttstock under armpit; muzzle up, level with chin; elbows down; finger off trigger, straight along receiver; thumb on selector.
High Port Position
- Muzzle vertical or nearly vertical.
- Firing hand on grip.
- Buttstock under armpit, top of weapon stock against front of armpit/shoulder, not in the shoulder.
Depressed Ready Position
- Muzzle down approximately 12" outside weak-side foot.
- Receiver flat against body.
- Buttstock flat against shoulder.
Short range combat firing positions
Unless instructed otherwise, firing-hand and support-hand positions for short-range firing:
- Firing hand - pulls buttstock into shoulder; elbows down; trigger finger straight along receiver.
- Support hand - grips handguard; applies rearward pressure; does not grip magazine well.
Standing Position
- Feet shoulder width apart.
- Toes pointed toward target.
- Strong foot slightly back 2-8".
- Knees bent, weight on balls of feet.
- Shoulders forward, slightly angled toward threat.
- Upper body aggressively forward, bent at waist; abdominal muscles tight.
- Cheek tight on top of buttstock.
- Buttstock down in full contact with upper pectoral muscle or body armor.
Strong and Support Side Standing Barricade Position
- Two arm lengths from barricade.
- Elbows down, not exposed.
- Bent at waist.
- Muzzle must clear barricade.
High Kneeling Position
- Used during reloading, immediate action, or firing over low cover.
- Fast to move in/out of.
- Strong-side knee on ground.
- Torso vertical with elbow off knee.
- Buttocks NOT on heel.
Low Kneeling Position
- Good for firing around cover.
- Support elbow rests outside support knee.
- Upper body rolled out to right or left.
Squatting Position
- Both elbows on knees.
- Feet flat on ground.
Prone
- Grip: buttstock in shoulder; muzzle up, level with chin; trigger finger off trigger along receiver; thumb on selector.
- With non-firing hand, lower yourself to the ground; keep weapon level and downrange (firing hand supports the weapon).
- Lay on stomach, resting on elbows for support.
- Heels rolled in so they are flat on the ground.
Field Camp Security ("Understand First")
The establishment of one or more key field camp security positions is important - without security, the mission fails. Some key positions you'll experience in BMT:
- Entry Control Point (ECP)
- Defensive Fighting Position (DFP)
- Security Teams
Your primary responsibilities when assigned to one or more field camp security positions: detect enemy activity and gather accurate information vital to mission success.
ECP
ECPs are manned by two individuals. This post is the first line of defense for a base, camp, tent, or building. Lives depend on how well you know and perform your duties. An EC:
- Provides deterrence.
- Sounds the alarm when hostile forces or suspicious packages are detected.
- Checks all personnel, packages, vehicles, and equipment brought into the camp.
When initiating challenging procedures, one sentry will engage the friendly forces or opposing forces (OPFOR) while their wingman watches over the situation and surrounding area. When relieved, pass on instructions and special information. NEVER leave your post unless properly relieved. Failure to maintain vigilance and control entry can result in punishment under the UCMJ.
Defensive Fighting Positions (DFPs) ("See First")
DFPs are a defensive structure built for two people. Should provide unrestricted observation and enemy engagement ports.
While in a DFP, you're responsible for a sector of fire determined by your position:
- In a two-person DFP, the individual on the left is responsible for the area from the center of the DFP to the front-left corner.
- The individual on the right is responsible for center to front-right corner.
Your sector of fire is based on terrain you're observing and the maximum effective range of your assigned weapon.
- Always keep your eyes and weapon pointed in the direction of your sector of fire.
- If your wingman becomes engaged in a challenge procedure, maintain vigilance on both your sector of fire and your wingman's challenge procedure.
- Don't leave your DFP unless properly relieved or when applying minimum force.
- When relieved, point your weapon toward the ground and slowly back out of the DFP (don't trip; move steadily).
Engaging Possible Threats
Challenging procedures are used anytime there's doubt about the identity or purpose of people in certain areas. When performing entry-controller or sentry duty, always assume the person is hostile if not personally identifiable.
To challenge individuals on foot:
- Command "HALT."
- Direct: "Raise your hands above your head, spread your fingers, and spread your feet."
- Proceed with sign/countersign procedures.
Challenging individuals in vehicles is similar but includes having the person exit the vehicle after halting.
Sign / Countersign ("Understand First")
Sign/Countersign: can be words or numbers. Before being posted at a DFP or ECP, ensure you know the sign and countersign.
- Verbal - if words are used, don't compromise them by speaking too loudly. Say in a normal tone of voice. If numbers are used, you'll be given a daily number. The sign / countersign should match the number given for the day, and the daily number must fall between two and ten. Example: if the daily number is 7, one combination is a sign of 5 and countersign of 2.
- Nonverbal - use hand signals to pass sign/countersign when speaking is hindered (loud activity inside or outside the ECP/DFP). Example: if the sign is the number 5 and the DFP holds up two fingers, the friendly force will hold up three fingers.
Initiate detainment procedures if you receive the wrong number for the countersign. As defender of a camp - manning a DFP or ECP - it's your duty to initiate the sign/countersign. If an individual approaches you and tries to give the sign, DO NOT give the countersign. This is a technique used to try and induce you into disclosing the countersign.
Duress Words
Duress words are typically given by a friendly defender who is being harmed or threatened by an aggressor forcing them to act against their will. An individual under duress may pass this word in conversation with the sentry to alert them.
Example: if the duress word is platypus, someone may say: "I'm looking for SSgt Platypus." / "Have you seen SSgt Platypus today?"
Upon hearing the duress word, the EC will consider the person (or each person in a group) hostile and immediately initiate detainment procedures. In a group, everyone is detained to minimize the threat.
The exercise duress word in BMT is "PLATYPUS."
SALUTE Reports
Any encounter requires a SALUTE report to be given to the commander via radio, messenger, wire, telephone, or any other available means. The messenger (you and your wingman) method is used to deliver SALUTE reports to the Unit Control Center (UCC) when deployed to the Combat Skills encampment.
| Letter | Title | Definition | Example |
|---|---|---|---|
| S | Size | Number of personnel or vehicles seen, or size of the object | Six enemy soldiers |
| A | Activity | Description of enemy activity - assaulting, fleeing, or observing | Soldiers were running away from DFP #3 |
| L | Location | Where enemy was sighted - use a map or readily identifiable reference point | Soldiers were heading towards the wood line |
| U | Unit or Uniform | Distinctive signs, symbols, or identification on people, vehicles or weapons - numbers, patches, or clothing | Soldiers were wearing camouflaged flight suits |
| T | Time | Time the activity was observed | Approximately 1100 hrs |
| E | Equipment | All equipment and vehicles associated with the activity | Soldiers carrying AK47 rifles, black backpacks, and gas masks |
Sample report: "Six enemy soldiers were running away from DFP #3, heading towards the wood line. Soldiers were wearing camouflaged flight suits at approximately 1100 hours. Soldiers were carrying AK47 rifles, black backpacks, and gas masks."
Detainment Procedures
Verbal commands:
- "PLACE YOUR WEAPON ON THE GROUND IN FRONT OF YOU!"
- "RAISE YOUR HANDS ABOVE YOUR HEAD!"
- "KEEP PALMS OPEN AND FINGERS SPREAD!"
- "TURN AWAY FROM THE SOUND OF MY VOICE!"
- "TAKE SIX STEPS AWAY FROM MY VOICE!" (if a group, have them move away from each other)
- "DROP SLOWLY TO YOUR KNEES!"
- "LIE DOWN ON YOUR STOMACH!"
- "MOVE YOUR ARMS AWAY FROM YOUR BODY!"
- "PALMS FACING UP!"
- "SPREAD FINGERS APART!"
- "SPREAD YOUR FEET APART!"
- "TURN YOUR FACE TO THE RIGHT, LEFT, OR STRAIGHT AHEAD!"
Note: ensure their head is turned in a direction that best conceals resources and DFPs.
After detainment:
- Maintain cover, monitor the situation and your sector of fire, and shout "SECURITY, ECP/DFP #!"
- Don't leave your position until two trainees properly relieve you and your wingman.
- Remain attentive and scan your sector of fire for other OPFOR while awaiting security.
- Issue any other commands to the OPFOR until help arrives (e.g., "STOP MOVING!").
Tactical Movements ("See, Understand and Act First")
Unit Movements
Unit movements maintain the highest degree of security when establishing initial contact with the enemy, reestablishing contact, or moving to maintain a low profile of detection.
Each member must demonstrate proper tactical skills. Maintain weapon muzzle awareness, and stop, look, and listen each time before moving.
The tactical march consists of two files:
- Front security consists of 3 individuals. The front individual is the point man - the most experienced member. The other two provide security for the point man. Front security maintains approximately 20 meters between themselves and the base file.
- The Tactical Deployment Leader (TDL) is centered between the base file and second file.
- Rear security consists of 2 individuals maintaining 20 meters distance away from the back of the two files. Periodically (every 3-5 seconds), turn and look backwards - do not walk backwards.
- The middle two files maintain approximately 5 meters between one another. The right file protects the right side of the team movement; the left file protects the left.
Team members should:
- Stay low and maintain weapon at the low ready position at all times.
- Observe and listen at all times.
- Avoid making unnecessary noise.
- Use hand and arm signals - maintaining silence is critical.
Hand and arm signals: stop, follow, move, down/prone, rally. All team members must mirror the signal to ensure everyone receives the message.
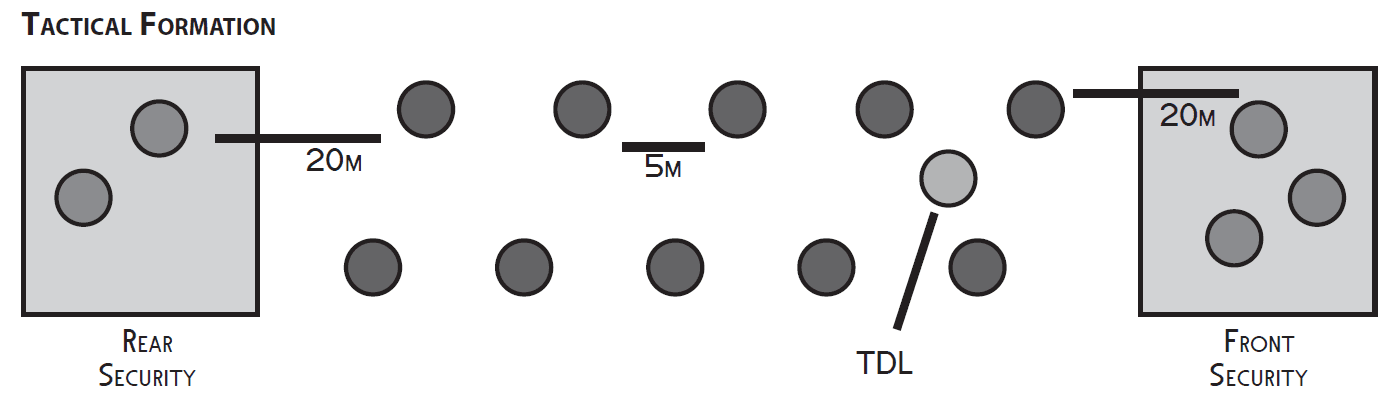
Tactical formation: rear security ↔ TDL ↔ front security with 20m and 5m spacing.
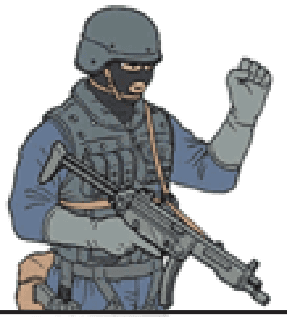
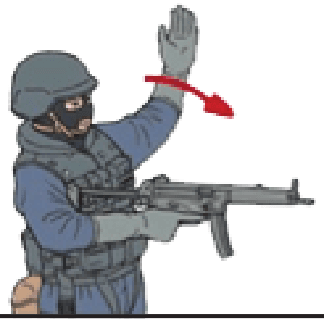
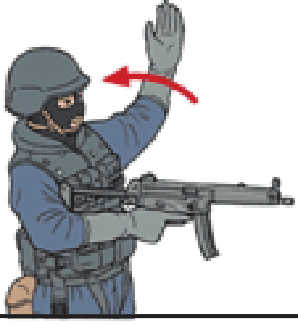
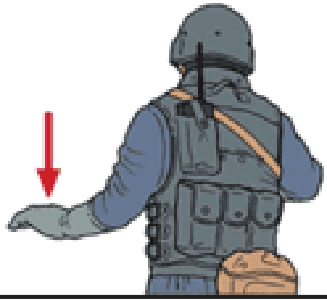
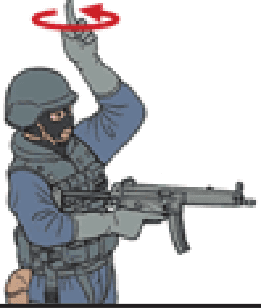
Individual Movements
Low Crawl
The low crawl is used when the route provides cover and concealment less than one foot high, the enemy has good observation visibility, and speed is not required.
To execute:
- Keep your entire body as flat as possible on the ground with your head facing away from the weapon.
- Grasp the sling as close as possible to the upper sling swivel with your firing hand.
- Let the hand guard rest on your forearm; ensure the muzzle is kept off the ground.
- To move forward, stay low, reach both arms forward, bring one knee forward.
- Pull with your arms, push with one leg to continue.
- Let the buttstock drag on the ground as you advance.
- Continue until you reach your next covered position. If your push leg becomes tired, switch to the other leg.
- Resume your prone shooting position at your destination - weapon pointed downrange.
High Crawl
Used when there's some cover and concealment available, the enemy has poor visibility, and speed is required.
To execute:
- Rest your weight on your elbows and lower legs, keeping the rest of your body off the ground.
- Cradle your weapon so the muzzle and magazine are off the ground; magazine facing up and away from your face.
- Lean forward on your forearms, cradling your weapon and sling in the bend of your elbows.
- Point the weapon away from your wingman and keep the muzzle off the ground.
- Advance by bringing one knee and the opposite elbow forward.
- Resume a shooting position once at a safe destination and maintain vigilance.
Rush and Roll
The rush and roll shifts you away from your last seen position to confuse someone trying to fire at you. Use when cover is unavailable and time is critical.
- Do this quickly but safely.
- Starts from the prone position.
- Visually select your next position before initiating any movement.
- Once clear, lower your head while drawing arms into your body, elbows down, pulling right leg forward.
- Raise your body in one movement by straightening your arms.
- Spring to your feet by stepping off with either foot.
- Run to the next position - keep distance short to avoid accurate enemy fire and try not to stay up longer than 3-5 seconds.
- Before hitting the ground, stop and plant both feet approximately shoulder width apart.
- Fall forward, breaking your fall with the non-firing hand; weapon pointed in the direction of enemy fire.
- Once back in prone, tuck weapon close to body, keep muzzle pointed downrange, and roll left/right away from wingman.
- After assuming the prone firing position, look for another target or position.
Use of Force
The decision by an officer or sentry to employ reasonable force is based on their perception of the subject's actions and the totality of circumstances.
Three elements
- Ability - Capability: the ability and capability of the subject to carry out a threatened action. The officer or sentry must perceive the person proposing the action or threat is capable of performing the action.
- Opportunity: the action or threat the officer or sentry perceives is imminent but not necessarily instantaneous. The subject must be in a position to carry out the act or threat.
- Intent: the mental state initiating an overt act (words or deeds) in advancement of a threat, action, or crime.
Types of Force
Minimum Force
Requires minimum actions - including the use of armed force sufficient to bring a situation under control or defend against a hostile intent or act. All actions must cease as soon as the target complies with instructions or ceases hostile action.
Minimum force should be used only in circumstances where an individual or group appears to have intent to breach the perimeter and does not display intent to use deadly force.
Note: the firing of weapons is to be considered a means of last resort.
When in range, quickly get to your feet and exit the rear of the ECP/DFP. The remaining defender must extend their sector of fire to cover the void you left behind. Keep your weapon sited on the OPFOR; this prepares you to use deadly force if OPFOR pulls a weapon. As you approach, transition to defensive posture and apply a rifle-fighting technique.
Butt Stroke
Used to disarm or subdue an aggressor with effective striking points to the chest, stomach, arms, and shoulders. Position the weapon with the sling-swivel side of the buttstock facing the individual. Step forward (with right or left foot) and swing the buttstock in an arc. Strike on the body with the sling- swivel side of the rifle buttstock. DO NOT STRIKE THE HEAD. The butt stroke may be performed using a vertical (upward), horizontal (right to left) swing, or somewhere in between. Recover to the defensive posture or follow up with another strike.
Slash
Used to disarm an individual or strike an aggressor in the shoulder area, across the collar bone, or on the forearm. Step forward with either foot while swinging the muzzle in a diagonal/downward motion. Strike with the sling-swivel point of the muzzle on the shoulder, collar bone, or forearm. Recover to the defensive posture or follow up.
Once done, site your weapon on OPFOR and quickly return to your ECP/DFP. Maintain cover, monitor the situation and sector of fire, and shout "SECURITY! ECP/DFP #!" When relieved, both you and your wingman deliver a SALUTE report to your designated UCC.
Note: clear your weapon at the clearing barrel prior to entering the UCC.
Deadly Force
When you reasonably believe you and/or others are in imminent danger of death or serious bodily harm.
Example: Someone enters your sector of fire and is raising their weapon to fire at you - what would you do?
Bottom Line: Deadly force must be used as a last resort after all other means of force have failed and at the first sign of hostile, deadly intent by the adversary. If you're not aware of the amount of force you're using, your actions could cause death or serious bodily harm.
Deadly Force Weapon Procedures
You need to "CHARGE YOUR WEAPON" immediately if OPFOR exhibits Capability, Opportunity, and Intent AND is carrying a weapon:
- With your non-firing hand, pull the "charging handle" straight back until it won't go any further, then release.
- The bolt will spring back to its original position, cocking the internal hammer and bringing a cartridge into the firing chamber.
- Weapon is now loaded and will fire when the selector lever is moved to "semi" or "burst".
If OPFOR shows hostile capability, opportunity, and intent to cause serious bodily harm, use deadly force. Remember - only use this technique as a last resort after all other means have failed. Keep your weapon pointed at OPFOR while moving the selector to "semi." Then pull the trigger to simulate firing.
Only the defender engaging OPFOR should fire on the individual. Your wingman must maintain cover and continue to monitor their sector of fire.
Once deadly force is used:
- Place selector level back to "SAFE."
- Maintain cover, monitor situation and sector of fire.
- Shout "SECURITY, ECP/DFP #!"
- When relieved, you and your wingman deliver a SALUTE report to your designated UCC.
- Clear your weapon at the clearing barrel prior to entering the UCC.
Summary
You've learned that all Airmen are essential in contributing to base defense. You must stay proficient on levels of threat, challenging procedures, and the characteristics associated with maintaining security. Remember - you may be placed in a situation where your actions will determine your safety and that of your wingmen.